emphyrea
Greenhorn
So, I was struggling with having multiple hair mods. I wanted them all. Initially, I tried Get Glam, but it was too buggy to work with many hairs, even after attempting conversions. I wanted so, so many cute styles at once but what I found was many were just either A) outdated xnb files, or B) would attempt to replace the same hair asset, so they would fight each other.
For some reason I never knew until recently that with the 1.5 update, you no longer have to replace hair, you can add them on without replacing ANY assets, and, I also in turn discovered that this can be done with content patcher! And, most importantly that this is so incredibly easy.
Mod Requirements:
I'd recommend to put your downloaded hair mod in some random folder that you will use just for conversions, so you don't have to keep looking for the one you just downloaded. Most, if not all, files you download will be zipped. Follow the directions below if you don't know how to unzip a file.
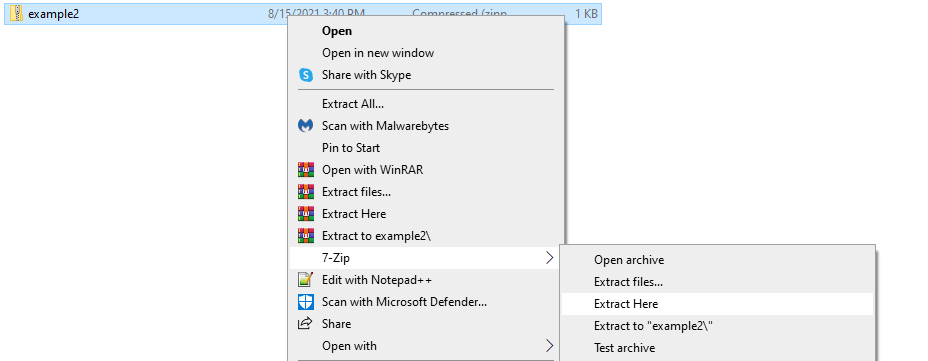
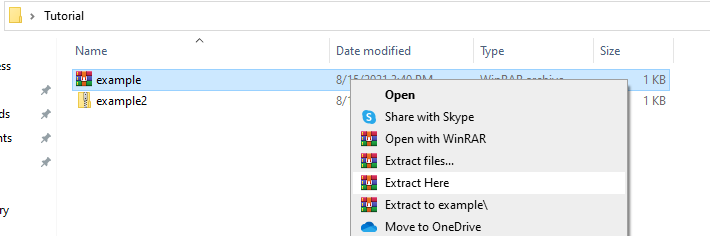
To unzip: Right click your zipped file. For Winrar: Look until you see the words Extract here, and click. For 7-Zip: Look until you see the word 7-Zip, and hover over this option until another menu shows up. On this menu there should be the words Extract Here. Click this. (I tend to use Extract here instead of other options simply because I find it simple.)
Step 2: Open your now Unzipped folder. What do you see?
Look in your newly unzipped folder. Inside you should see the following:
-A folder inside the folder. Usually named "assets." I will be referring to this folder as the assets folder.
-A content.json file
-A manifest.json file
Look inside the assets folder. Do you see a .png or an XNB file?
If an XNB file, you will have to follow this extra step before you continue, and that is converting it into a .png to be able to be used with content patcher with ease. If using the XNB-Mod-Toolkit, follow the directions inside.
If an .png file, continue to the next step!
Step 3: Open your .png file in Aseprite and the content.json file in Notepad ++. Begin editing the content.json.
- To open a file in Notepad ++, right click the file and click "Edit in Notepad++".
- We will open the .png in Aseprite because it is easier to count tiles this way. This will be used for the edits we will need to make in the content.json file.
In the content.json file, many times you will something along the lines of the following code:
Everything in Red is what we will be changing.
Important: assets is the assets folder, if you have a different name, then replace this with the exact name of your assets folder. hairstyles.png is an example name of the .png in the assets folder. This can also be any name so long as it matches the name of the actual .png. ex) if your .png inside your assets folder is named "MyHair," and the assets folder is named "hair" then the code should read "hair/MyHair.png".
What this code means: Computer, Load hairstyles.png into/as this file named "hairstyles" in the game. To do this, go to the assets folder and get the hairstyles.png file, and put it into Characters > Farmer > hairstyles. (because it is being loaded as the hairstyles file, which is the actual file holding all of the game's vanilla hairs for the farmer, it in turn replaces that file with your hairstyles.png. That is what this code does and that is what we want to change, since we don't want to actually replace the vanilla assets.)
For my example, we will say my .png is still named hairstyles. First, we change the target "hairstyles" to something else. It could be anything. I will call it "Tutorialhairs" for this tutorial. I will also add a comma after the "}" after the whole "Fromfile" line to tell the computer to continue after that code onto the next, which we will be adding next.
Everything in light blue is changes that I have made.
We now will add the most important part, the code telling the game (through content patcher) to add on the hairs within the .png file we have as new entries on top of the vanilla ones, along with how to tell where these hairs are on the picture and how to add them.
The new code is placed after the comma we added:
Now this can look confusing, but it is actually pretty simple.
I will explain to you what each of these parts mean:
The code is telling content patcher to go and edit the hair data of the game and add the following entries as new entries in the list of hairs, along with the sprites and additional information such as if the hair has unique right and left sides or not, or if the hair should change to a different hairstyle when wearing a hat, etc.
"123456" --any unique key/number that will be the number assigned to this one individual hair. You want this to be unique and different for each entry. This number goes up to Int32 and cannot go beyond. I used 123456 as a placeholder.
After this number, there is "Tutorialhairs/0/0/false/-1/false". Each of these words/numbers is an entry meaning something specific. I will be referring to these with numbers starting with 0 representing the very first entry.
0 - the filename of the file we are adding to Character/Farmer, in this example I used "Tutorialhairs" as the target file so in turn I have to have Tutorialhairs as the filename.
1 - the x-coordinate of one of the hair sprites from left to right by tiles, always starting with 0. (think graphs)
2 - the y-coordinate of one of the hair sprites from top to bottom, always starting with 0.
3 - true or false. If this hair sprite in particular has a unique left vs right sprite or not. True = yes, there is a unique left and right sprite, False = mirror the side sprite to be the same for either side
4 - Either the unique ID (the unique key) of the hair to use to change the hairstyle to when wearing a hat, or -1 to keep the same hair but just behind the hat.
5 - true or false. If this hair sprite is a bald style or not. True = yes, it is a bald style. False = No, it is not a bald style.
For 1 and 2, we will need the .png in Aseprite for easy counting of tiles. Below is a picture using an example of hairs and how each tile location is counted, along with how each of those individual hairs would be read written replacing the 0/0 in the format above for each one.
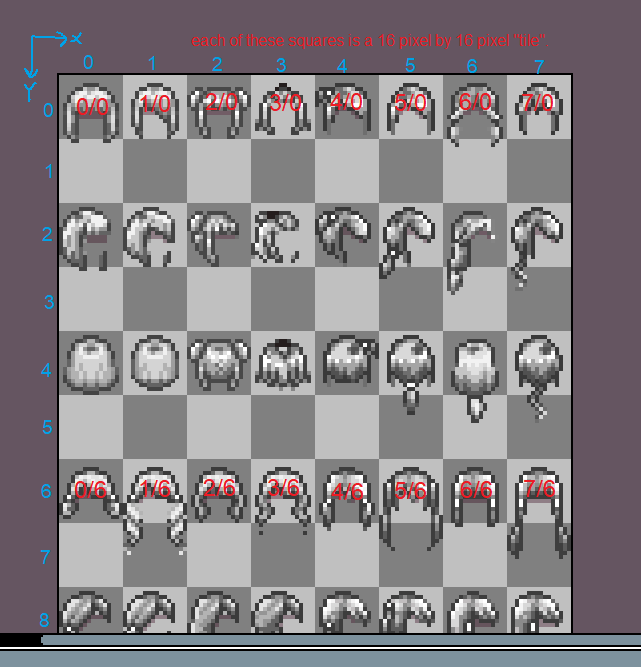 To add each individual hair, we need a new line within Entries. If I were to add each of these 16 hairs in the picture, the code would be something like this.
This is really all the coding and work needed to make the conversion! Now just place the entire folder into your mods folder, and if everything is done correctly, your hairs should be added in the game as additional hairs!
You are free to use this example code above for your own use, just change the file names and unique keys for your purposes! This can also be used to make your own hairs, just use your own .png file and instead copy a manifest file and edit it in that case for appropriate mod credit.
For some reason I never knew until recently that with the 1.5 update, you no longer have to replace hair, you can add them on without replacing ANY assets, and, I also in turn discovered that this can be done with content patcher! And, most importantly that this is so incredibly easy.
Mod Requirements:
- Content Patcher --this will load your hair mods for you :)
- SMAPI --to get Content Patcher to work.
- Notepad ++ --This allows you to edit .json files while keeping the format.
- Aseprite --allows you to make or edit sprites, I prefer this to any other program since with a transparent background it also has 16x16 tiling which makes it so much easier to work with. This tiling is also super important for making assets for any pixelated games in general!
- XNB-Mod-Toolkit -- Necessary only if you are converting XNB files to be Content Patcher compatible. This tool converts your XNB files to .png files. (this one I use in particular also gives .yaml files. You can just delete those when you get them, they are not used for this.)
- 7-Zip and/or Winrar --both are free software (yes, even Winrar) that allows you to unzip .zip or .rar files as a proper folder. Most mods for any game tends to be zipped so I recommend these software not just for Stardew Mods but for others as well.
Converting Hairs
Step 1: Download your hair and unzip the file.
I'd recommend to put your downloaded hair mod in some random folder that you will use just for conversions, so you don't have to keep looking for the one you just downloaded. Most, if not all, files you download will be zipped. Follow the directions below if you don't know how to unzip a file.
To unzip: Right click your zipped file. For Winrar: Look until you see the words Extract here, and click. For 7-Zip: Look until you see the word 7-Zip, and hover over this option until another menu shows up. On this menu there should be the words Extract Here. Click this. (I tend to use Extract here instead of other options simply because I find it simple.)
Step 2: Open your now Unzipped folder. What do you see?
Look in your newly unzipped folder. Inside you should see the following:
-A folder inside the folder. Usually named "assets." I will be referring to this folder as the assets folder.
-A content.json file
-A manifest.json file
Look inside the assets folder. Do you see a .png or an XNB file?
If an XNB file, you will have to follow this extra step before you continue, and that is converting it into a .png to be able to be used with content patcher with ease. If using the XNB-Mod-Toolkit, follow the directions inside.
If an .png file, continue to the next step!
Step 3: Open your .png file in Aseprite and the content.json file in Notepad ++. Begin editing the content.json.
- To open a file in Notepad ++, right click the file and click "Edit in Notepad++".
- We will open the .png in Aseprite because it is easier to count tiles this way. This will be used for the edits we will need to make in the content.json file.
In the content.json file, many times you will something along the lines of the following code:
{
"Format": "1.11.0",
"Changes": [
{
"Action": "Load",
"Target": "Characters/Farmer/hairstyles",
"FromFile": "assets/hairstyles.png"
}
]
}
"Format": "1.11.0",
"Changes": [
{
"Action": "Load",
"Target": "Characters/Farmer/hairstyles",
"FromFile": "assets/hairstyles.png"
}
]
}
Everything in Red is what we will be changing.
Important: assets is the assets folder, if you have a different name, then replace this with the exact name of your assets folder. hairstyles.png is an example name of the .png in the assets folder. This can also be any name so long as it matches the name of the actual .png. ex) if your .png inside your assets folder is named "MyHair," and the assets folder is named "hair" then the code should read "hair/MyHair.png".
What this code means: Computer, Load hairstyles.png into/as this file named "hairstyles" in the game. To do this, go to the assets folder and get the hairstyles.png file, and put it into Characters > Farmer > hairstyles. (because it is being loaded as the hairstyles file, which is the actual file holding all of the game's vanilla hairs for the farmer, it in turn replaces that file with your hairstyles.png. That is what this code does and that is what we want to change, since we don't want to actually replace the vanilla assets.)
For my example, we will say my .png is still named hairstyles. First, we change the target "hairstyles" to something else. It could be anything. I will call it "Tutorialhairs" for this tutorial. I will also add a comma after the "}" after the whole "Fromfile" line to tell the computer to continue after that code onto the next, which we will be adding next.
{
"Format": "1.11.0",
"Changes": [
{
"Action": "Load",
"Target": "Characters/Farmer/Tutorialhairs",
"Fromfile": "assets/hairstyles.png"
},
]
}
"Format": "1.11.0",
"Changes": [
{
"Action": "Load",
"Target": "Characters/Farmer/Tutorialhairs",
"Fromfile": "assets/hairstyles.png"
},
]
}
Everything in light blue is changes that I have made.
We now will add the most important part, the code telling the game (through content patcher) to add on the hairs within the .png file we have as new entries on top of the vanilla ones, along with how to tell where these hairs are on the picture and how to add them.
The new code is placed after the comma we added:
{
"Format": "1.11.0",
"Changes": [
{
"Action": "Load",
"Target": "Characters/Farmer/Tutorialhairs",
"Fromfile": "assets/hairstyles.png"
},
{
"Action": "EditData",
"Target": "Data/HairData",
"Entries": {
"123456": "Tutorialhairs/0/0/false/-1/false",
},
}
]
}
"Format": "1.11.0",
"Changes": [
{
"Action": "Load",
"Target": "Characters/Farmer/Tutorialhairs",
"Fromfile": "assets/hairstyles.png"
},
{
"Action": "EditData",
"Target": "Data/HairData",
"Entries": {
"123456": "Tutorialhairs/0/0/false/-1/false",
},
}
]
}
I will explain to you what each of these parts mean:
The code is telling content patcher to go and edit the hair data of the game and add the following entries as new entries in the list of hairs, along with the sprites and additional information such as if the hair has unique right and left sides or not, or if the hair should change to a different hairstyle when wearing a hat, etc.
"123456" --any unique key/number that will be the number assigned to this one individual hair. You want this to be unique and different for each entry. This number goes up to Int32 and cannot go beyond. I used 123456 as a placeholder.
After this number, there is "Tutorialhairs/0/0/false/-1/false". Each of these words/numbers is an entry meaning something specific. I will be referring to these with numbers starting with 0 representing the very first entry.
0 - the filename of the file we are adding to Character/Farmer, in this example I used "Tutorialhairs" as the target file so in turn I have to have Tutorialhairs as the filename.
1 - the x-coordinate of one of the hair sprites from left to right by tiles, always starting with 0. (think graphs)
2 - the y-coordinate of one of the hair sprites from top to bottom, always starting with 0.
3 - true or false. If this hair sprite in particular has a unique left vs right sprite or not. True = yes, there is a unique left and right sprite, False = mirror the side sprite to be the same for either side
4 - Either the unique ID (the unique key) of the hair to use to change the hairstyle to when wearing a hat, or -1 to keep the same hair but just behind the hat.
5 - true or false. If this hair sprite is a bald style or not. True = yes, it is a bald style. False = No, it is not a bald style.
For 1 and 2, we will need the .png in Aseprite for easy counting of tiles. Below is a picture using an example of hairs and how each tile location is counted, along with how each of those individual hairs would be read written replacing the 0/0 in the format above for each one.
{
"Format": "1.11.0",
"Changes":
[
{
"Action": "Load",
"Target": "Characters/Farmer/Tutorialhairs",
"Fromfile": "assets/hairstyles.png"
},
{
"Action": "EditData",
"Target": "Data/HairData",
"Entries": {
"123456": "Tutorialhairs/0/0/false/-1/false",
"123457": "Tutorialhairs/1/0/false/-1/false",
"123458": "Tutorialhairs/2/0/false/-1/false",
"123459": "Tutorialhairs/3/0/false/-1/false",
"123460": "Tutorialhairs/4/0/false/-1/false",
"123461": "Tutorialhairs/5/0/false/-1/false",
"123462": "Tutorialhairs/6/0/false/-1/false",
"123463": "Tutorialhairs/7/0/false/-1/false",
"123464": "Tutorialhairs/0/6/false/-1/false",
"123465": "Tutorialhairs/1/6/false/-1/false",
"123466": "Tutorialhairs/2/6/false/-1/false",
"123467": "Tutorialhairs/3/6/false/-1/false",
"123468": "Tutorialhairs/4/6/false/-1/false",
"123469": "Tutorialhairs/5/6/false/-1/false",
"123470": "Tutorialhairs/6/6/false/-1/false",
"123471": "Tutorialhairs/7/6/false/-1/false",
},
}
]
}
This is really all the coding and work needed to make the conversion! Now just place the entire folder into your mods folder, and if everything is done correctly, your hairs should be added in the game as additional hairs!
You are free to use this example code above for your own use, just change the file names and unique keys for your purposes! This can also be used to make your own hairs, just use your own .png file and instead copy a manifest file and edit it in that case for appropriate mod credit.
Last edited: